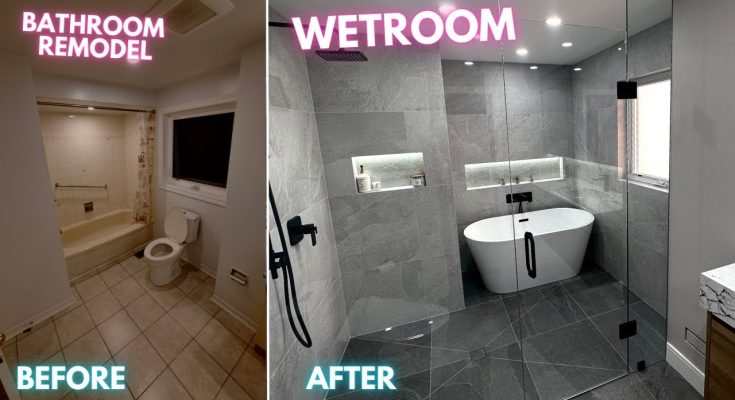
A wetroom is a stylish and practical bathroom design where the shower area is open and fully integrated with the rest of the space, creating a sleek and modern look. Wetrooms are ideal for maximizing small spaces, improving accessibility, and adding value to your home. However, they require careful planning and execution to ensure they are functional and waterproof. Here’s a step-by-step guide to building a wetroom for your bathroom renovation.
1. Understand What a Wetroom Is
A wetroom is a waterproofed bathroom where the shower area is level with the floor, eliminating the need for a separate shower tray or enclosure. The entire bathroom floor is designed to handle water, with proper drainage to prevent flooding. Wetrooms are perfect for creating a minimalist, spa-like environment and are particularly useful for small bathrooms or individuals with mobility challenges.
2. Plan Your Wetroom Layout
Before starting, plan the layout carefully. Identify where the shower, toilet, sink, and storage will be placed. The shower area should ideally be located at the far end of the room to minimize water splashing onto other fixtures. For smaller wetrooms, consider wall-mounted fixtures to save space and enhance the streamlined look.
3. Set a Budget and Gather Materials
Determine your budget for the project, considering costs for waterproofing materials, drainage systems, tiles, fixtures, and labor if necessary. Essential materials include a wetroom tanking kit (for waterproofing), a gradient shower tray or former (to create the slope for drainage), waterproof tiles, and a suitable drainage system.
4. Prepare the Space
Start by stripping the bathroom back to its bare walls and floors. Remove any existing tiles, fixtures, and old waterproofing layers. Ensure the subfloor is level, clean, and sturdy enough to handle the wetroom installation. If your subfloor is wooden, you may need to reinforce it or replace it with a waterproof alternative like concrete board.
5. Waterproofing (Tanking)
Waterproofing is the most critical step in building a wetroom. Use a wetroom tanking kit to seal the walls and floor. Apply a waterproof membrane or paint to every surface that may come into contact with water, including areas behind the sink and toilet. Pay special attention to corners, seams, and where pipes penetrate walls or floors, as these are common areas for leaks.
6. Install the Drainage System
A wetroom requires an efficient drainage system to prevent water pooling. Install a shower tray former with a pre-set slope or create a sloped gradient on the floor using a screed. Connect the tray or slope to a floor drain, ensuring it is securely sealed to the waterproofing layer.
7. Tile the Wetroom
Choose non-slip, waterproof tiles for both the floor and walls. Large-format tiles with fewer grout lines are ideal for a seamless look. Apply a flexible, waterproof tile adhesive and grout to prevent cracks caused by movement or moisture. Ensure tiles slope gently toward the drain to guide water flow.
8. Install Fixtures and Fittings
Once the tiles are in place and the adhesive has dried, install the shower, sink, toilet, and any other fixtures. Wall-mounted faucets, shelving, and toilets are excellent choices for wetrooms as they reduce clutter and make cleaning easier. Consider a glass screen if you want to contain water spray without compromising the open design.
9. Test for Leaks
Before completing the renovation, thoroughly test the wetroom for leaks. Run water in the shower and inspect all areas for signs of seepage. Address any issues immediately to avoid long-term damage.
10. Add Finishing Touches
Add accessories such as towel hooks, mirrors, or plants to personalize the space. Choose finishes and decor that enhance the wetroom’s minimalist aesthetic, such as neutral colors, natural materials, or sleek metallic accents.
Conclusion
Building a wetroom is a rewarding renovation project that can elevate the functionality and aesthetics of your bathroom. While it requires careful planning and attention to detail, a well-executed wetroom is durable, easy to maintain, and adds a touch of luxury to your home. Whether you’re creating a spacious spa-like retreat or a compact, accessible bathroom, this design offers both style and practicality.
Video


